이 글은 공부를 위해서 "Testing React Apps"를 번역 정리한것 입니다. 예제는 TypeScript를 사용하도록 수정되었고, 내용도 현재 버전에 맞도록 수정된 곳이 있습니다. 전체 내용은 원문을 참고 하시기 바랍니다.
React App을 jest로 테스트하기 위한 가장 간단한 설정 방법은 Create React App을 사용해서 프로젝트를 만드는 것입니다. Create React App을 사용해서 프로젝트를 생성했다면 이미 jest를 사용할 수 있도록 구성이 되어 있을 것입니다. 여기에 화면 렌더링 스냅샷을 테스트할 수 있는 하나의 패키지만 추가로 설치하면 됩니다.
# yarn 사용시
$ yarn add --dev react-test-renderer

# typescript를 사용하면 type 추가
$ yarn add --dev @types/react-test-renderer


# npm 사용시
$ npm install --save-dev react-test-renderer

# typescript를 사용하면 type 추가
$ npm install --save-dev @types/react-test-renderer
1. 스냅샷(Snapshot) 테스트
스냅샷 테스트는 컴포넌트의 현재의 스냅샷을 저장해 두고, 다음 테스트시 새로 만든 스냅샷과 비교하여 변경이 되었는지를 테스트합니다.
1) 테스트용 컴포넌트를 하나 만듭니다. 프로젝트의 src 폴더 아래에 Link.tsx 파일로 만듭니다. 컴포는트는 속성으로 링크할 URL(page 속성)와 화면에 보여질 링크 텍스트(children 속성)을 받아 <a> 링크를 생성합니다. 이벤트로는 마우스가 링크 위로 올라갈때과 내려갈때 CSS 클래스를 변경합니다.
import { useState } from 'react';

const STATUS = {
    HOVERED: 'hovered',
    NORMAL: 'normal',
};

// interface LinkProps { page: string, children: string }
// type LinkProps = { page: string, children: string }

export default function Link(props: {page: string, children: string}) {
    const [status, setStatus] = useState(STATUS.NORMAL);

    const onMouseEnter = () => {
        setStatus(STATUS.HOVERED);
    };

    const onMouseLeave = () => {
        setStatus(STATUS.NORMAL);
    };

    return (
        <a
          className={status}
          href={props.page || '#'}
          onMouseEnter={onMouseEnter}
          onMouseLeave={onMouseLeave}
        >
        {props.children}
        </a>
    );
}
2) Link 컴포넌트를 테스트할 테스트 파일을 만듭니다. src 폴더 아래에 __test__ 폴더를 만듭니다. 이 폴더에 테스트 파일을 모아둘 것입니다. 파일 이름은 Link.test.tsx 입니다. 테스트는 .toMatchSnapshot() 매쳐를 사용합니다.
import renderer, { ReactTestRendererJSON } from 'react-test-renderer';
import Link from '../Link';

it('changes the class when hovered', () => {
  const component = renderer.create(
    <Link page="http://offbyone.tistory.com">쉬고 싶은 개발자</Link>,
  );
  let tree = component.toJSON() as ReactTestRendererJSON;
  expect(tree).toMatchSnapshot();

  // 수동으로 이벤트 발생
  renderer.act(() => {
    tree.props.onMouseEnter();
  });
  // 재 렌더링
  tree = component.toJSON() as ReactTestRendererJSON;
  expect(tree).toMatchSnapshot();

  // 수동으로 이벤트 발생
  renderer.act(() => {
    tree.props.onMouseLeave();
  });
  // 재 렌더링
  tree = component.toJSON() as ReactTestRendererJSON;
  expect(tree).toMatchSnapshot();
});
테스트를 실행( yarn test )하면 테스트 파일이 있는곳에 __snapshots__ 폴더가 만들어지고, 스냅샷 파일이 만들어집니다. 파일명은 Link.test.tsx.snap 입니다. 아래는 스냅샷 파일의 내용입니다.
// Jest Snapshot v1, https://goo.gl/fbAQLP

exports[`changes the class when hovered 1`] = `
<a
  className="normal"
  href="http://offbyone.tistory.com"
  onMouseEnter={[Function]}
  onMouseLeave={[Function]}
>
  쉬고 싶은 개발자
</a>
`;

exports[`changes the class when hovered 2`] = `
<a
  className="hovered"
  href="http://offbyone.tistory.com"
  onMouseEnter={[Function]}
  onMouseLeave={[Function]}
>
  쉬고 싶은 개발자
</a>
`;

exports[`changes the class when hovered 3`] = `
<a
  className="normal"
  href="http://offbyone.tistory.com"
  onMouseEnter={[Function]}
  onMouseLeave={[Function]}
>
  쉬고 싶은 개발자
</a>
`;
3) 변경한 후 테스트를 해 봅니다. 링크의 URL을 offbyone.tistory.com에서 www.facebook.com으로 변경하고 테스트 합니다.
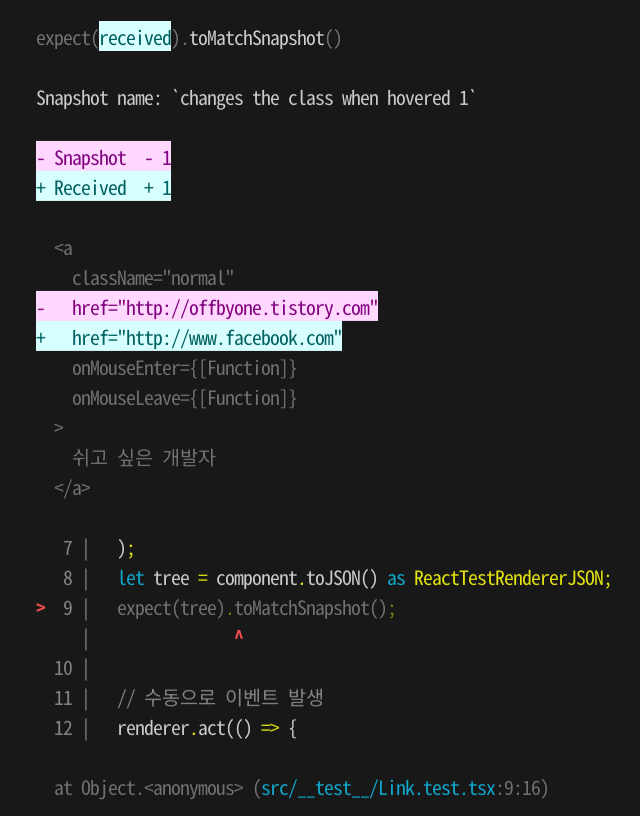
테스트로 변경사항이 발생했음을 알 수 있습니다. 의도된 변경 사항일 경우 스냅샷을 업데이트하여 둡니다.
# 스냅샷을 업데이트 합니다.
$ yarn test -u
2. DOM 테스트 하기
렌더링된 컴포넌트를 단언(assertion)하고, 조작하려면 react-testing-library를 사용할 수 있습니다. 이 패키지는 create-react-app을 사용해서 프로젝트를 만들었다면 이미 들어있을 것입니다(devDependencies가 아니라 dependencies 항목에 들어 있음).
1) 테스트용 컴포넌트 CheckboxWithLabel.tsx 파일을 만듭니다.
import {useState} from 'react';

export default function CheckboxWithLabel(props: {labelOn: string, labelOff: string}) {
  const [isChecked, setIsChecked] = useState(false);

  const onChange = () => {
    setIsChecked(!isChecked);
  };

  return (
    <label>
      <input type="checkbox" checked={isChecked} onChange={onChange} />
      {isChecked ? props.labelOn : props.labelOff}
    </label>
  );
}
2) 테스트 파일을 만듭니다. CheckboxWithLabel.test.tsx 파일입니다.
import {cleanup, fireEvent, render, screen } from '@testing-library/react';
import CheckboxWithLabel from '../CheckboxWithLabel';

// Note: @testing-library/react@9.0.0 이상의 버전을 사용한다면
// 자동으로 cleanup되므로 afterEach()가 필요 없습니다.
afterEach(cleanup);

it('CheckboxWithLabel를 클릭후 텍스트 변경', () => {
  render(<CheckboxWithLabel labelOn="On" labelOff="Off" />);

  expect(screen.getByLabelText(/off/i)).toBeTruthy();

  fireEvent.click(screen.getByLabelText(/off/i));

  expect(screen.getByLabelText(/on/i)).toBeTruthy();
});
처음 렌더링 후에는 텍스트가 off 입니다. 클릭 이벤트를 발생시킨 후에는 레이블 텍스트가 on 으로 바뀐것을 테스트 합니다.
※ 참고 자료
Snapshot Testing · Jest
Snapshot tests are a very useful tool whenever you want to make sure your UI does not change unexpectedly.
jestjs.io
- eslint-plugin-testing-library
GitHub - testing-library/eslint-plugin-testing-library: ESLint plugin to follow best practices and anticipate common mistakes wh
ESLint plugin to follow best practices and anticipate common mistakes when writing tests with Testing Library - GitHub - testing-library/eslint-plugin-testing-library: ESLint plugin to follow best ...
github.com
'프로그래밍 > 자바스크립트' 카테고리의 다른 글
| React 프로젝트 copy해서 옮기기 (0) | 2023.06.20 |
|---|---|
| [TypeScript] 타입 선언 ( : type )과 타입 단언( as type ) (0) | 2023.06.19 |
| [React] 테스트 프레임웍 jest (3/4) - jest Matchers (0) | 2023.06.17 |
| [React] 테스트 프레임웍 jest (2/4) - jest API (0) | 2023.06.13 |
| [React] 테스트 프레임웍 jest (1/4) - 샘플 프로젝트 만들기 (0) | 2023.06.05 |